Homework #4 is designed to introduce you to the basics of website preparation and translation.
This complements our first class on website localization...
PART 1 - Setting Up
Download the following applications. Save to your desktop and install all.
- BeyondCompare
- Okapi Toolkit
- Microsoft Expression Web
- Similar free options for Mac can be found here
PART 2 - Project Background & Preparing Source Files For Translation
You've been working with a local travel agency named Compass Travel for a while. They have used you to translate their travel promotion mailers into other languages for tourists to the tri-state.
In a new campaign aimed at targeting more adventurous travellers from outside the USA, they are promoting some new travel packages. They are looking to you to translate their newly designed mini-website (also called a "microsite") which is staged at compass.ritzdorfacademy.com.
Their webmaster has supplied you with everything you need to
get started in the .zip file hyperlinked here -- all source files
and graphics for their microsite are included.
Step #1: Prepare the Folder Tree
- Set up the following folder tree as shown here on your C:\ drive
Step #2: Download/Unzip the Source Files
- Download and save the .zip attachment hyperlinked in the "Background" section above to your "C:\Translation Jobs\Compass Travel\01_Source" folder
- Unzip the file but make sure to preserve the entire
original directory structure
- If you're curious: The shortcut to do this in most compression utilities is by right-clicking on the .zip. In the right-click menu select [Name of your compression application, e.g., IZarc, WinZip, 7Zip] > Extract Here...
- Start to take a look at the source files by first opening
the "homepage" in your internet browser. In this case
our homepage is index.htm. Follow the links from the
homepage to get a feel of the project and the scope of work
involved. How is the content from a linguistic standpoint? Is
this hard/easy to translate?
You will want to also open a few of the files in Notepad to get a look at the code and see the raw inner workings of the file...Does it have CSS? Can I recognize the translatable content from the code in all cases? Does it have areas I'm not familiar with and I might have to research/read about?
Please do the following to disable it.
Tools > Internet Options
> Advanced > under
Security add a check in the box next to "Allow
active content to run in files on My Computer"
Do not worry, this will not make your computer vulnerable to anything
Step #3: Separating Out the Web Content
Because websites are often a jumbled mix of many types of files under dozens of directory folders, it is easiest to deal with content by breaking the site into smaller parts, each segregated by file type. In the next few steps, we will begin to separate the translatable web-based content (in our case, the HTML and the PHP content) from the non-translatable content (such as CSS).
- Create two folders for the web-based content in
the "C:\Translation Jobs\Compass Travel\02_Prep"
folder: HTML (for the .htm / .html files) & PHP (for
the .php files)
- Launch "BeyondCompare" -- START > Programs > BeyondCompare > BeyondCompare
- Maximize the window so that BeyondCompare takes up your whole screen
- In the left side column, click the Browse folder icon
 and
select the folder which contains the source files at
"C:\Translation Jobs\Compass Travel\01_Source\Compass_Site"
and click OK
and
select the folder which contains the source files at
"C:\Translation Jobs\Compass Travel\01_Source\Compass_Site"
and click OK
- If you're curious: You can also simply drag the whole folder of source files and drop it on the text box next to the "Browse" button
- In the right side column, click the Browse folder icon and select the empty "HTML" folder you just created at "C:\Translation Jobs\Compass Travel\02_Prep\HTML" and click OK
- In the menu select View > Expand All
- You should now see the full directory of source files on the left and nothing on the right (since your "HTML" folder is empty)
- Filter the source directory to show only the "HTML" files, by clicking into the File Filters text area in the toolbar or by going to Session > File Filters in the menu
- Type over the 'filter'
*.* with *.htm*
- If you're curious: For those of you who don't know, * is a "wildcard" character in Windows. It indicates any string of characters. *.htm* means "search for any file that starts with any name (*), has a ".htm" in it (.htm) and then ends in anything (*)"
- I could also use *.htm (no asterisk at the end), but if I do, I will not catch HTML files that might have the extension *.html, thus the extra asterisk at the end (to catch the possible letter "L") Note: HTML files can have an extension of either ".htm" or ".html"
- Hit [Enter]
- Now there should only be HTML files in the left column because everything else is hidden from view.
- Note: If you have file types other than HTML displaying, please start over from Step #12. Carefully follow instructions.
- Select EVERYTHING on the left using your mouse
- ...or under the menu, use Edit > Select All
- Now click on the Copy icon in the toolbar or go to Actions > Copy in the menu
- You are now presented with the Copy dialog box
- Click Start
- The program will now copy all the files and folders that you have identified on the left over to the right (from...\01_Source\Compass_Site ...to... \02_Prep\HTML)
- Check your folder at "C:\Translation Jobs\Compass Travel\02_Prep\HTML". You will see that only the HTML files from the source have been copied over to the "...\02_Prep\HTML" folder, including any folders/subfolders that contained HTML.
- Repeat the process from step #9-#16, selecting the "...\02_Prep\PHP"
folder on the right in step #9 and filtering for the PHP files (*.php)
in step #12...
- IMPORTANT! make sure to hit [Enter] to refresh the screen each time you type a new filter in step #12
If you are curious: In a real project how you set up your folders and copy over files will depend on your source website file types. You might have to repeat this process for file types such as ASP, JSP, ASPX, XHTML, XML, SSI or any other of a number of web-based files.
For a full list of possible file types, see Wikipedia: http://en.wikipedia.org/wiki/List_of_file_formats#Webpage.
- Please read the next section for how to proceed
PART 3 - Identifying and transforming the encoding of web-based content
Text on a website can be rendered in a huge number of ways depending on the written language. These renderings are called "encodings." Rendering a page in an encoding which it was not designed for, will result in corruption of the text and garbage to appear when the site goes "live." In the next few steps, we will look at the encoding of our source files and transform them to Unicode (specifically "UTF-8") to guarantee that no matter what non-English language script we insert into our web files, they can support and display it without issue.
Each language has at least 3-4 possible encodings, one of which is the universal lingua-franca of encodings called "Unicode."
Just to make it more confusing, there are different types of "Unicode", but the one designed specifically for the web is called UTF-8 (stands for Unicode Transformation Format - 8-bit). It is the only one you need to remember for websites.
Step #1. Identifying the encoding of the source
We must first know what encoding our files are currently in before we can transform them into another encoding. Follow these guidelines to figure out the encoding of your source files in most cases:
- Open one of the HTML files in Notepad
- Search for the attribute "charset" inside the <META> tags of
your source HTML. It will be in the first few lines of code from
the top and should look like this:
<meta http-equiv="Content-Type" content="text/html; charset=XXXXXX"> - If the value of "charset" starts with...
- iso-8859-... and is followed by a one or two digit number, your source is using the ISO code page for the source language
- windows-... and is followed by a four digit number, your source is using the Windows code page for the source language
- utf-8, the site is using the multilingual Unicode web standard
- gb..., shift-jis, big5 or euc / ksc..., then the source language must be East Asian and it is in a government standardized code page
- if there is no "charset" in a META tag, the source code page is not defined. Unless the client has indicated otherwise, just assume the ISO code page appropriate for the source language (or the government defined code pages for Chinese, Japanese and Korean). These are listed in the “Standardized” Code Page column of the the handout Code Page Chart for Common Languages.
Step #2. Transforming the encoding of the source
- Launch "Rainbow" --If you downloaded the .zip from the link at the top of this page, unzip the folder and double-click on rainbow.exe inside the folder
- If you're curious: The shortcut to do unzip in most compression utilities is by right-clicking on the .zip. In the right-click menu select [Name of your compression application, e.g., IZarc, WinZip, 7Zip] > Extract Here...
- If nothing happens when you doucble click on rainbow.exe: Make sure you have the latest version of Java installed on your machine
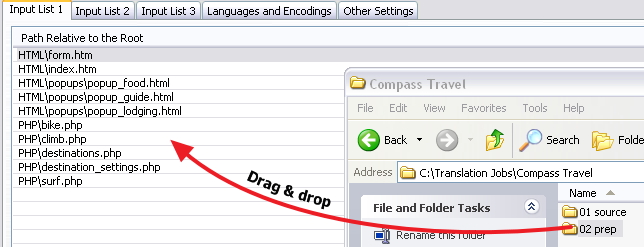
- Drag & drop your 02_Prep\ folder onto Input List 1 in Rainbow
- Now you should see a listing of all your web-based files in the Input List 1 tab of the main Rainbow window.
- Highlight all the files in the list
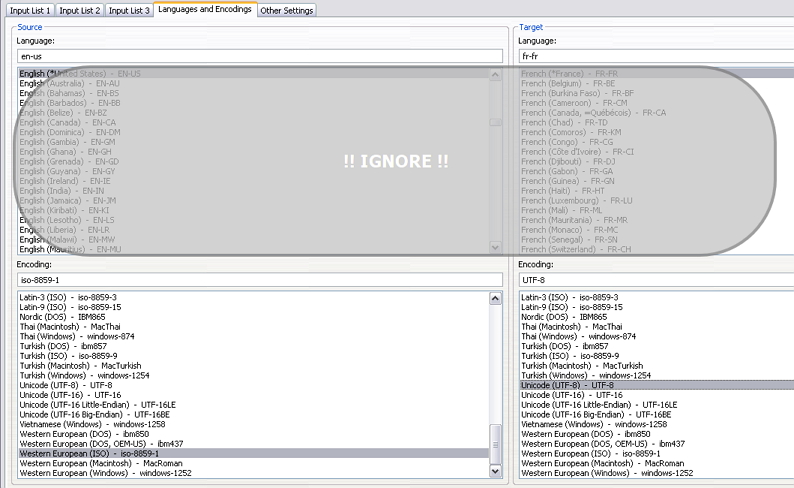
- Click the Languages & Encodings tab
- Under the left Source column, select the Encoding: of your source language files from the list (ignore the Language: list...it has no effect in this case)
- Under Encoding: in the right Target column
select the universal encoding for ALL languages ---
Unicode (UTF-8) by using the list (again, you can
ignore the Language: list)
-
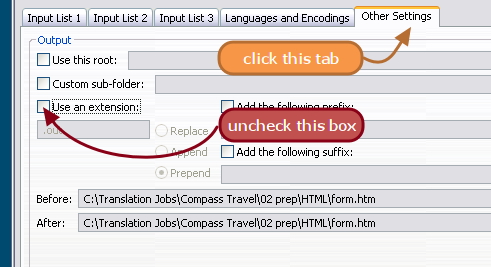
- Now click the Other Settings tab (just to the right
of the Languages & Encodings tab)
- Uncheck the box to the left of Use an extension
- Next, in the main Rainbow menu select Utilities > Conversion Utilities > Encoding Conversion...
- Click the Output tab
- Remove the check from the box for Use Byte Order Mark for UTF-8 output
- Click the Execute button
- It will seem like nothing has happened, but your files have now been transformed into an encoding that can support ANY language: "Unicode"...specifically "UTF-8" for the web
- NOTE: Your encoding META tag has also been automatically updated to reflect this encoding switch
- To make sure all worked correctly, look at the META tag (specifically the "charset" attribute) in any HTML file in "01_Source"...it reads "iso-8859-1"
- Now look at the same HTML file in "02_Prep"...it should now read "UTF-8"
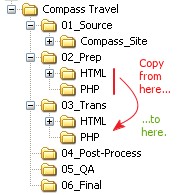
- Go to "C:\Translation Jobs\Compass Travel\02_Prep"
- Copy all the folders from here (in our case, we have the HTML and PHP folders) and Paste the copied folders in "...\03_Trans"
- If you are curious: In a real project the folders we will copy all depends on how many folders you had to create to separate out your source website content types. You might have to copy more than just two folders.
- Your folder tree should now look as follows:
- Open "Microsoft Expression Web" --- START > Microsoft Expression > Microsoft Expression Web 4
- Note: Never mistake tools like Microsoft Word with specialized web file or code editing tools like "Expression Web." Although HTML files can be directly opened in Word, Microsoft Word is not able to properly interpret the coding and will render the files useless when saving back out to HTML. Opening an HTML file directly in Word is one of the most common ways I see translators destroy web-based files. It is an immediate sign of a translator who has no clue what they are doing.
- If you are presented with a dialog which asks if you want to use Expression Web as the "default web editor", uncheck the box and select "No":
- Select Site > Open Site.. from the top menu
- The Open Site dialog box will appear....browse to "C:\Translation Jobs\Compass Travel\03_Trans" and click Open
- In the Folder List at the upper left you
will see the two folders that make up our tree in "...\03_Trans"
- If you're curious: The Open Site function allows us to define a single "root" folder which contains all the content we want to translate. It's easier to do this from the start so we can access files in a single click rather than have to use File > Open...to open the files one by one. This will make more sense as we progress.
- In the Folder List click on the plus [+] to
the left of each folder to expand the folder tree. Keep clicking
on the plus signs to open up your entire folder tree.
- Your Folder List should now look as follows:
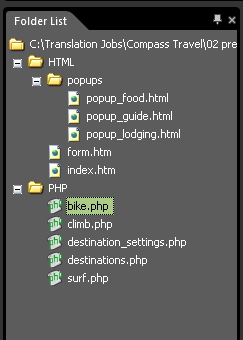
- From the Folder List select the first .html file from "...HTML\popups" and double-click on it to open
- You will see the contents open in the right side editor pane
- In the bar below the editor pane (left corner) select the Split view
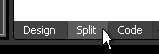
- In the top ½ of the screen you should have a view of the code, in the bottom ½ of the screen you can see how the code would be presented in a browser
- In the code view, the HTML has been color coded. This helps to easily identify content in a sea of code. but be warned, no tool is perfect at knowing what is translatable text and what is code...we will see this in the next section
- Note: we separated all the content from its design elements (such as the CSS and the graphics) so the file might not look "pretty"
- In the top menu, go to Tools > Page Editor Options... > click on the General tab > and check the box Word wrap to make the code easier to see. By doing this we can wrap the lines so we don't have to scroll side to side.
- You can now begin translation by overwriting the English content in either the top "code" view OR in the bottom "design" view.
- WARNING! Should you choose to place your cursor in the "design" view at bottom, you MUST keep your eyes on the "code" view at the top as you translate. It is very easy to accidentally delete, modify and/or add codes by accident when working in the "design" view. Use [Ctrl] + [Z] (Undo command) on your keyboard to undo any mistakes immediately as they happen!
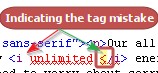
- One of the great things about using a dedicated website
code editor is that it will warn you when you delete something
important (like a tag) by changing color. In the case of
Expression Web, if you make a mistake, it will
immediately begin highlighting the inconsistency in the code
view.
- To quickly preview your file (without graphics or style -- since we removed the linked graphics and CSS) you can go to File > Preview in Browser and select the browser and resolution that you would prefer
- Now please use this method to translate all the files in the Folder List except for destination_settings.php...save each file on completion.
- You have now completed about 90% of the translation work, but as mentioned no tool is perfect at finding all translatable text. There is still more to translate...we just have to work a bit harder to find it!
- Follow Part 4, steps 1-2 above
- Open Trados Workbench and TagEditor
- Open the files in TagEditor one-by-one from both the
HTML & PHP folders and translate
- NOTE: Instead of opening one-by-one, you can batch prepare the HTML by pre-translating against an empty TM in Workbench ("Tools" > "Translate")
- Save as TagEditor bilingual files (*.ttx) into "03_Trans"
- Use "Clean Up" ("Tools" > "Clean Up") to post-process
your *.ttx files back to their original formats
- this will create a set of *.html and *.php in addition to your *.ttx
- Follow Part 4, steps 1-2 above
- Open memoQ
- Create a new memoQ project and save into "03_Trans"
- In the "Translations" pane add all the files from both
the HTML & PHP folders
- NOTE: Instead of opening one-by-one, you can batch prepare using "Add folder structure"
- Open the files from the "Translations" pane and translate
- Save your memoQ project
- Export all the files into "03_Trans" when complete
- Follow Part 4, steps 1-2 above
- Open SDLX Edit
- Open the HTML in SDLX one-by-one and translate
- NOTE: Instead of opening one-by-one, you can batch prepare using the SDLX "Project Wizard" - or - batch prepare from the SDLX switchboard using the menu ("Tools">"Convert Files")
- Save the SDLX bilingual files (*.itd) into "03_Trans" making sure to replicate the same file structure as "02_Prep/HTML"
- Batch post-process the files back to their original
formats using the "Project Wizard", or batch post-process
from the SDLX switchboard using "Tools">"Convert
Files">"Merge"
- this will create a set of *.html and *.php in addition to your *.itd's
PART 4 - Translating the Web-based Content
In these next steps you will be using a free "visual" web editor from Microsoft called "Expression Web" to manage and translate your files. This tool will allow you to easily distinguish between translatable text vs. non-translatable code within the web markup. But be warned, no tool is perfect at knowing what is text and what is code in all cases...we will see this in later steps.
Prepare and translate the files in your preferred TM tools rather than using "Sharepont Designer." You should only attempt this if you are very comfortable with your tools and have the time to figure things out how translating HTML works in your particular tool. I will not have time to support anyone on their preferred tool, BUT I encourage you to use them if you have the skills. The tool documentation, the help system, internet searches and online support groups can be used for queries. Here's some very basic instructions for some common TM tools:
TRADOS - Using TRADOS "TagEditor"
memoQ - Using memoQ
SDLX - Using SDLX "Edit"