In Homework #5 - Part 2 we will begin the localization of our graphics with solid backgrounds using PhotoShop, the most commonly used editing and art creation program used by graphic designers.
PART 1 - Download and Install Photoshop
Click on the hyperlink to be directed to download a trial of
"Photoshop." Follow instructions and install.
http://www.adobe.com/go/tryphotoshop
WARNING: This is only a trial of
the Photoshop program. If you are serious about doing graphics
localization you will need to buy a fully registered version of
the software (price varies depending on academic discounts, etc.).
All the other applications we use in this course are free or below
$50.
PART 2 - Set Up XnView to Open Images Directly in PhotoShop
- Right-click on the "...02_Prep/GRAPHICS" folder and select Browse With XnView from the right-click menu
- XnView will now launch. Maximize the window to take up the whole screen.
- Right-click on the GRAPHICS folder and select Show all files (recursive) from the right-click menu
- Select any image and right click
- In the right-click menu go to Open With > Configure programs...
- Browse to "C:\Program Files\Adobe\Photoshop [Version
#]" and select "Photoshop.exe"
- Note: If you have installed your copy of PhotoShop to another location on your computer or you are using a different version you might have a different directory location for "Photoshop.exe." You can find it by using performing a search for "Photoshop.exe" in "C:\Program Files
- Click Open
- Close XnView
Now you will be able to load graphics into PhotoShop directly from XnView simply by right clicking them! This is a great time saver!
PART 3 - Graphics Localization Basics
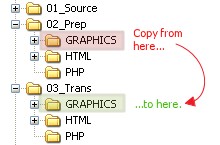
Step #1: Move your GRAPHICS folder to the next step
- Copy the "GRAPHICS" folder from "...\02_Prep"
- Paste the folder in "...\03_Trans" next to the HTML & PHP folders
Step #2: Load A Simple Image From XnView into PhotoShop for Editing
- Right-click on the "...\03_Trans\GRAPHICS" folder and select Browse With XnView from the right-click menu
- XnView will now launch. Maximize the window to take up the whole screen if it isn't maximized
- Right-click on the GRAPHICS folder in XnView and select Show all files (recursive) from the right-click menu
- XnView will now load and display all the graphics in "...\03_Trans\GRAPHICS" and all its subfolders
- In XnView, right-click on one of the following images
- bike_header.gif
- climb_header.gif
- surf_header.gif
- From the popup menu select Open With > Adobe Photoshop [Version #]...
- PhotoShop should now launch and load your image from XnView
If you're curious: we are dealing with these first because they are simple and thus quite good for learning the basics.
For the remainder of this lesson, please print out the following for instructions on the basics of graphics localization in Photoshop:
Why print? Because working in
Photoshop is a very visual effort with many steps, it is quite
difficult to simultaneously read instructions on your computer
screen while performing these tasks. Also, I wanted to keep the
images in the instructions as big as possible. I have provided the
attached PDF for your convenience.
