In homework #5 we will be switching gears and taking our first steps in the all important subject of graphic localization. We will be starting by simply organizing and preparing the graphics which contain text.
PART 1 - Setting Up
First download, unzip and install:
- Xenu's Link Sleuth
- Mac users should use a clone of Xenu for Mac called Integrity
Afterward, please follow the hyperlink to be directed to download:
Save XnView MP to your computer and double-click on it to install. When installation is complete, configure XnView for greater ease of use by following these directions:
- Go to START > Programs > XnView MP> XnView MP
- In the XnView menu go to Tools > Settings
- Click on Integration in the left-side menu
- Check Add "Browse with XnView MP" to context menu
- Click OK
- Close XnView
Note: You will not need to repeat these steps again unless you uninstall XnView. XnView will save these preferred settings moving forward.
PART 2 - Graphic File Maintenance
Step #1: Arrange the File Tree
Because websites are often a jumbled mix of many types of files under dozens of directory folders, it is easiest to deal with content by breaking the site into smaller parts, each segregated by file type. In the next few steps, we will begin to separate the graphical content from the other assets using "BeyondCompare", just as we did for the HTML and PHP.
- Create a folder named "GRAPHICS" for the graphical content in the "C:\Translation Jobs\Compass Travel\02_Prep" folder

Step #2: Separate the Images from Other Content
- Launch "BeyondCompare" -- START > Programs > BeyondCompare > BeyondCompare
- Maximize the window so that BeyondCompare takes up your whole screen
- In the left side column, click the Browse
folder icon and select the folder which contains the source
files at "C:\Translation Jobs\Compass Travel\01_Source\Compass_Site"
- If you're curious: You can also simply drag the whole folder of source files and drop it on the text box next to the "Browse" button
- In the right side column, click the Browse folder icon and select the empty "GRAPHICS" folder you just created at "C:\Translation Jobs\Compass Travel\02_Prep\GRAPHICS"
- In the menu select View > Expand All
- You should now see the full directory of source files on the left and nothing on the right (since your "HTML" folder is empty)
- We now need to filter the source directory to show only the graphic files in our source website by clicking into the File Filters text area in the toolbar or by going to Session > File Filters in the menu
- If you're curious: BeyondCompare might still be applying the filter we created last time when separating out the HTML & PHP if you haven't used the application since then.
- Type in the following
filters separated by a semi-colon:
*.gif ; *.jpg ; *.jpeg ; *.png - Note: The most common graphic formats for the web are: GIF, JPG, JPEG, or PNG...thus we are filtering for these
- Hit [Enter]
- Now there should only be the graphic file types we filtered for in the list on the left and nothing on the right (since your "GRAPHICS" folder is empty)
- Note: If you have file types other than graphics listed, please start over from Step #5. Carefully follow instructions.
- Select EVERYTHING on the left using your mouse
- ...or under the menu, use Edit > Select All
- Now click on the Copy icon in the toolbar or go to Actions > Copy in the menu
- You are now presented with the Copy dialog box
- Click Start
- The program will now copy all the files and folders that you have identified on the left over to the right (from...\01_Source\Compass_Site ...to... \02_Prep\GRAPHICS)
- Close BeyondCompare
- Go check your folder at "C:\Translation Jobs\Compass Travel\02_Prep\GRAPHICS". You will see that only the graphics from the source have been copied over to the "...\02_Prep\GRAPHICS" folder, including any folders/subfolders that contain graphics.
- If you're curious: Learn more about graphic file types from these resources:
PART 3 - Graphic File Preparation
Now that we have a copy of the graphics from the source, we
need to keep only those that require translation (i.e., those that
have text on them). XnView is a graphics viewing and organization
application, designed to help allow for multiple images to be
maintained at once so it is well suited for this task.
Step #3: Remove Images that Do Not Contain Translatable Text
- Right-click on top of the "GRAPHICS" folder in "02_Prep" and select Browse With XnViewMP from the popup menu
- XnView will now open. Maximize the window to take up the whole screen if not maximized already.
- In the directory pane on the left you will see you are at the "GRAPHICS" root of your directory tree (only look..don't start clicking around on other folders)
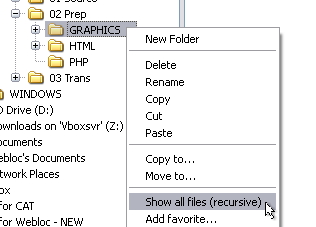
- Right-click on the GRAPHICS folder and select Show all files (recursive) from the right-click menu
- XnView will now load and display all the graphics in "...\02_Prep\GRAPHICS" and all its subfolders on screen for you.
- In XnView, select on one or more graphics that do not have text and remove by hitting the [Delete] key (or right-click and select Delete... from the right-click menu)
- Once you have deleted all the graphics which do not
contain text, move onto the next step. DO NOT CLOSE
XnView YET!
- Note: If you have accidentally closed Xnview already, please repeat steps #1 - 5
Step #4: Identify All Images with Text Actually Used in The Website
We now want to get a complete picture of which remaining graphics actually link to the content pages (the HTML and PHP in this case). We need to trace hyperlinks from the HTML & PHP to the graphics. If the connection to a graphic exists, then we can assume the graphic is used in the site. If not connected, then we can remove the graphic since it won't require localization.
The best way to figure out which graphics are used in the site (and which are not) is to check the "live" source site using a "link checker" application. These tools identify all hyperlinked content including the graphics used in the site.
Why are we doing this? I don't get it :-( When you get an entire website dumped on you in full (the usual case), oftentimes less than 50% of the images you are provided are actually "called up" in the web content. Therefore you should never waste time translating all the graphics you are given. More often than not only a fraction of them might actually end up being used in the real web pages! Who wants to waste time and labor for nothing, right?
- Launch "Xenu's Link Sleuth" -- "START > Programs > Xenu's Link Sleuth > Xenu"
- In the menu go to File > Check URL...
- The Xenu's starting point dialog will open
- Under What address do you want to check? , copy/paste
in the URL of the source English site
- In our case, our source site is at "http://compass.ritzdorfacademy.com"
- When Xenu asks if you want a report, click No
- You will now see a list of all the checked links from the source website.
- Now click on Type in the grey bar to sort the links by type.
- If you're curious: We are only going to focus on the images/[image type] links.
- Now click on Address to sort the images/[image type] links alphabetically
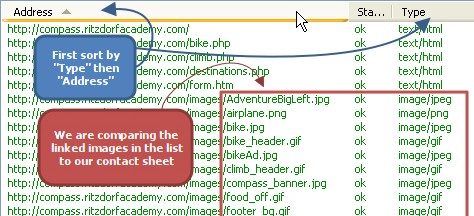
- Go back to XnViewMP
- In the XnView menu, go to View > View As > Thumbnails & Details
- Put XnView and Xenu side-by-side on your screen
- Look at the name of the first image in the list in XnView.
Does this image appear in the list of links in the Xenu report?
- If so, move onto the next image
- If not, delete the image from XnView
- Note: Don't forget about rollover images! These will have two versions of a single image, one "on" (sometimes called "over") and one "off" version. If you see one, then assume you will need both the "on" and "off" versions.

Click on the image to see a larger version in another window!
- Repeat step #11 until you have gone through all the graphics listed in XnView
Step #7: Prepare a Listing of Text in Images
- In the XnView menu, go to View > View As > Thumbnails & Details
- Go to the top of the list of images and select the 1st image
- Right-click and select Set comment...
- The Set Comment dialog will appear
- Type the English text in the box under Description
- Click on the Write button when done

- Repeat Step 3 for every image listed
- Select all the images by going to Edit > Select All
- In the XnView menu select Create > File Listing.... A dialog will appear.
- Set the parameters of what you want in your file list as follows by:
- removing all items except {Directory}/{Filename With Ext}
- adding a new item
- inserting the {Annotation} variable to the new item
- Click Copy to Clipboard
- Immediately proceed to the next step
- Huh? What's happening?: All the image descriptions we created have now been copied to your clipboard with the image name. We need to empty our clipboard (i.e., "paste" this information somewhere) before doing anything else.

Step #8: Create a "Callout Table" for Translation
- Open Microsoft Excel
- Go to File > New and create a new workbook
- Select cell A1
- Go to Edit > Paste ...the information on your clipboard will be pasted into Excel into two columne: A & B
- If something goes wrong and ALL your text ends up in column A only:
- Go to Data > Text to Columns...
- The Text Import Wizard dialog will appear indicating that Excel knows this is text that needs to be broken into columns of data to become a "proper" spreadsheet
- Under Choose the file type that best
describes your data select Fixed Width
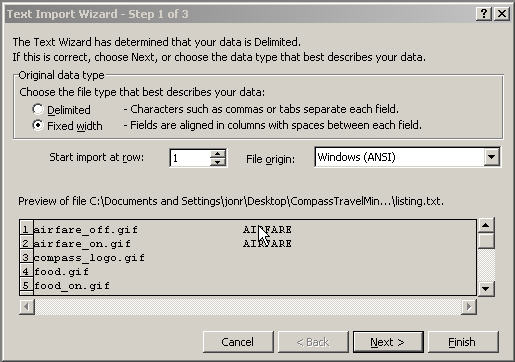
- Click on Next >
- Follow the instructions in the dialog to create a line that will represent where the column "break" should occur to separate your English text from the name of the image you copied the text from.
- Click on Next >
- Now you will have a preview of how your file will be broken up into columns when you are done. If it looks correct click on Finish, if it looks wrong click on < Back and repeat Step#9
- Once you have clicked on Finish you will have a cleanly separated spreadsheet in front of you with graphic names in Column "A" and the English text in Column "B"
- Type your translations in Column "C"
- When you are done with your translations of the image
text go to File > Save As....
- under Save in: pull down the menu and select "...\03_Trans"
- name the file "Callout Table For Graphics"
- click Save
- Close Excel
Note: You are now done with the translation portion for our graphics...in the next part we will lead our actual graphics through the "localization" process to create true images with the translated text on top. All this is just the starting point!
Also Note: If your client has requested that you ONLY
translate the text of the graphics (and not actually adapt the
images) you can simply provide them with this file and skip the
next step. In our case we are going to also provide the additional
service of graphics "localization"...not just a simple table of
source and target text.