In homework #10 you will complete your work on the Compass Travel website; first performing a check of all hyperlinks followed by a full visual QA pass. After making any required changes you will zip the final delivery for submission to the client.
PART 1 - More Link QA Using "Xenu's Link Sleuth"
Now we will Xenu to check our "staged" site against the source to check for any broken file/graphic links.
Step #1: Launch 1st Instance of "Xenu's Link Sleuth" and Check the HTML File Paths
- Launch "Xenu's Link Sleuth" -- "START > Programs > Xenu's Link Sleuth > Xenu"
- In the menu go to File > Check URL...
- The Xenu's starting point dialog will open
- Under What address do you want to check? , copy/paste
in the URL of your staged localized site
- In our case, our staged site is at "http://compass.ritzdorfacademy.com/[your
student number]"
- In our case, our staged site is at "http://compass.ritzdorfacademy.com/[your
student number]"
- When Xenu asks if you want a report, click No
- You will now see a list of all the checked links from your localized copy of the website. The broken links are in red, good links are in green
Step #2: Launch 2nd Instance of "Xenu's Link Sleuth" and Check the HTML File Paths
- Launch "Xenu's Link Sleuth" -- "START > Programs > Xenu's Link Sleuth > Xenu"
- In the menu go to File > Check URL...
- The Xenu's starting point dialog will open
- Under What address do you want to check? , copy/paste
in the URL of the source English site
- In our case, our source site is at "http://compass.ritzdorfacademy.com"
- When Xenu asks if you want a report, click No
- You will now see a report of all the links from the original website. The broken links are in red good links are in green.
Step #3: Compare Reports
- Compare any errors in the source list vs. the target list.
Look carefully at all broken links in red...
- are the number of broken links the same?
- are the links that are broken the same ones?
- If the target error report does not match the source error
report, you have broken links. You need to...
- find the error that does not match the source from the list
- read the description in the "Error" column
- select (highlight) the error in the list, right-click on the error and you will get a menu, select Properties
- all the pages exhibiting the error are listed under "[X] page(s) linking to this one:"in the dialog
- Depending on the error type, the fix will be different. If the file is "not found"...
- you might have forgotten to put all the files in the target directory
- your localized folder tree might not match the source directory (file for file, folder for folder)
- you might have a broken hyperlink in the code.
- To resolve this error, open the file(s) with the error (the ones under [X] page(s) linking to this one) in Expression Web and attempt to find and fix the problematic link(s)
- EXAMPLE:
When saving localized graphics, you saved a JPEG as a 4-letter extension ".jpeg" (e.g. "mygraphic.jpeg") to the "images" folder. |
The path in the HTML lists the link to the graphic as "images/mygraphic.jpg"
Xenu will tell you it can't find "images/mygraphic.jpg."
To resolve the error you simply need to rename the file extension of "mygraphic.jpeg" to "mygraphic.jpg
Step #4: Re-check Target Links
- Repeat all steps when you think you have fixed all the errors
- Check the target error list against the source list again
- Once all link errors are resolved, you are complete
PART 3 - Visual QA
- Open up a browser window (Internet Explorer or Firefox) and enter the URL of the source website
- In our case, our source site is at "http://compass.ritzdorfacademy.com"
- Open a second tab in your browser, in the second tab enter the URL of the target website
- In our case, the target site is at "http://compass.ritzdorfacademy.com/[your student number]"
- Your source and target should now be loaded in one browser window, but in two separate tabs.
- Go to the source site tab, click on a link to bring up a webpage
- Go to the target site tab, click on the same link in the target to bring up the localized version of the same page
- Switch between the two tabs a few times by using the
[Ctrl] + [Tab] combination on your keyboard and
carefully compare the two pages by checking for errors in the...
Web-content (HTML/PHP)- misspellings
- mistranslations
- untranslated text
- consistency of language
- EXAMPLE: If text on a button appears in three pages, the button should always have the same text in each instance unless there is a good reason
- text should all display properly...no "garbage" characters should appear
- all pages should load properly
- ideally, no awkwardly wrapped text
- no cut-off text
- all Javascript working in the source should work in the
target
- i.e., if the Javascript is doing something in the source when you initiate an action, it should do the same thing when you initiate the same action in the target
Graphics:- misspellings
- mistranslations
- untranslated text
- missing
- not loading
- text is too small to read or badly "squashed"
- text unclear
- colors of target graphics do not match source colors
- position does not match source (X, Y position on screen
is very different from the source)
When dealing with rollover images also check for...
- broken "on" version (tested by placing your mouse over the image)
- "jumping" text (tested by placing your mouse over the
image)
When graphics are grouped in a series also check for...
- misalignment with one another (horizontal & vertical
alignment)
- EXAMPLE: in the source, the 3 graphics which have popups are all left (horo.), center (vert.) aligned. It would be a problem if in your target one graphic matches the source alignment and 2 are center (horo.), center (vert.) aligned. Everything in the series would look uneven.
- evenly spaced from one another
- mismatched colors
- EXAMPLE: 1 is burnt orange, 2 are brown
- font sizes, kerning, leading, tracking, width,
height...etc.
- GENERAL RULE: If you have a group of
graphics, no ONE graphic should stand out as
"strange" from the others. If the text in one graphic
needs to be smaller or more tightly spaced because of a
longer translation, then ALL the others should be shrunk
in turn even if they fit already at a larger size!
You need to create a consistent look & feel.
- Basically anything that stands out as visually unappealing
(and does not exist in the source) needs to be corrected in
"05_QA" before final delivery. If you find problems, note them.
PART 4 - Correcting Errors & Publishing our Corrections
Eventually you will find a page with a mistake. When you do, you have to edit the page to correct the mistake. You also need to get the corrected file up to the web via the FTP site in an efficient manner. These next three steps will show you how to do just that.
Step #1: Correct Errors to Your Pages in Expression Web
- Open Microsoft Expression Web (START > Microsoft Expression > Microsoft Expression Web)
- In the Folder List at the upper left you can see if you have any sites open already. If you do have a site listed, close it using the menu Site > Close
- Now select Site > Open Site.. from the top menu
- The Open Site dialog box will appear....browse to "C:\Translation Jobs\Compass Travel\05_QA" and click Open
- Double-click the file you want to change from the Folder List
- Your page will open in a "tab" at the top
- Switch to the Split view (code at the top, display view at the bottom) as we did before when translating the files
- Make any edits needed
- Save the changes (File > Save)
Step #2: Publishing Corrections Direct to the FTP Site (and to "the Web")
In this step you will set up a direct connection between the files we maintain locally on our hard drives and those that are maintained on the FTP server (i.e., those that are connected to the remote (staged) site on the internet)
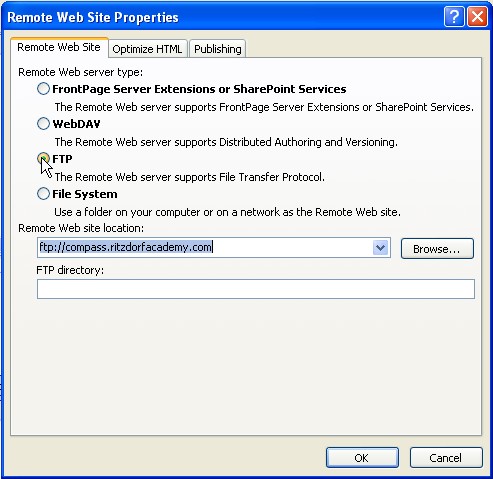
- Select File > Publish Site...
from the main menu
- you will be presented with the Remote Web Site
Properties dialog
- select FTP from the Remote Web server type: options list
- under Remote Web site location: enter ftp://compass.ritzdorfacademy.com
- leave the FTP directory: field blank
- Click OK
- you should now be presented with a Connect to
[website URL] dialog
- enter your FTP User name: and
Password (same ones you used when uploading
your files in FileZilla)
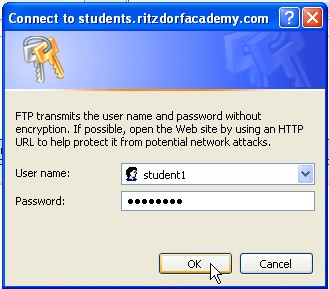
- if your login credentials are correct you will now
see a file/folder listing with your local files
on the left (those on your hard drive in the "05_QA"
folder). And the remote files are on the right (those
being read from the FTP server mapped to
compass.ritzdorfacademy.com).

- if your login credentials are wrong, make sure you
have entered your login correctly and try again when
prompted
- If you're curious: Folder "05_QA" on
our our local computer's hard drive is now directly
linked from to the FTP server which houses our
website on the internet. This will make it easy to
upload files directly to the internet "staged"
website.
- If you're curious: Folder "05_QA" on
our our local computer's hard drive is now directly
linked from to the FTP server which houses our
website on the internet. This will make it easy to
upload files directly to the internet "staged"
website.
- enter your FTP User name: and
Password (same ones you used when uploading
your files in FileZilla)
- you will be presented with the Remote Web Site
Properties dialog
- In the Local web site: pane, browse to and
select (highlight) the file you just edited in Step #1
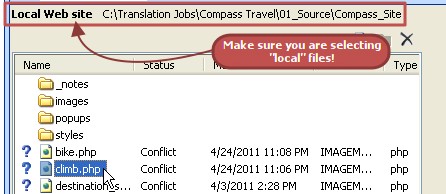
- Click on the right arrow
 in
the grey separator to move your file from you "local" hard drive
and publish it to the "remote" ("staged") site on the internet.
in
the grey separator to move your file from you "local" hard drive
and publish it to the "remote" ("staged") site on the internet. - If you are prompted Do you want to overwrite this file? click Yes
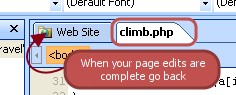
- Now go back to your browser (Internet Explorer or Firefox) and enter the internet URL of the page you just edited (e.g., compass.ritzdorfacademy/1/climb.php)
- Note: If you left the localized page with the error(s) open in your browser before you started working in "Expression Web" you may simply refresh the page [F5] to see the edit. This is easier and less cluttered than opening up another browser instance or tab.
- You should now see the edits you made on the live pages in
the browser
Step #3: Moving Forward with More Edits (and Publishing the Corrected Pages)
Now that you have set up the connection between your local files and the remote (staged) site on the FTP, it is easy to simply make a correction to a file on your hard drive, upload it to the server in a single click and see the changes instantly on the internet
- During visual QA you will likely find other pages that need corrections
- Double-click on any page that needs correction in the Local web site: pane to open the file for editing
- Your page will open in a "tab" at the top
- Make any edits needed
- Save the changes (File > Save)
- Now you can simply click the Web Site tab
in "Expression Web" to get back to the listing of your
Local web site: pane with the "remote" files on the
right
- To upload your changes just select the file(s) you
corrected and click on the right arrow in
the grey separator to move your file(s) from you "local" hard
drive to the "remote" ("staged") site.
- Keep repeating the following pattern until you have checked
all the pages in your site:
- check the page "live" on the internet
- identify any errors
- edit the "local" file on your hard drive to correct any errors
- save the file
- publish the changed "local" page to the "remote" ("staged") website
- repeat the visual QA check in the browser to verify the changes
- if the page is fully corrected, move onto the next
PART 5 - Create a Perfect Delivery for Your Client
- Once you are sure you have visually checked all the webpages and corrected all issues, create a .zip of your target website in "05_QA" and cut/paste the .zip into "06_Final"
- YOU SHOULD ALWAYS SEND FINAL DELIVERIES OF WEBSITES EXACTLY AS DELIVERED TO YOU
- i.e., a .zip file with the final target website ONLY, not your whole directory of "01_Source...02_Prep...03_Trans...etc."!!!
- DRAFT A CLIENT FACING EMAIL AND ATTACH THE .ZIP
- i.e., "Dear Mr. Ritzdorf..."
- SUBMIT AN INVOICE FOR SERVICES RENDERED WITH THE DELIVERY